NTLDR - Boot.ini - Missing NTDETECT

NTLDR is missing
NTLDR is missing. Press CTRL + ALT + DELETE to restart

NTLDR is missing ဆိုတဲ့ ျပႆနာဟာ ကြန္ပ်ဴတာအသံုးျပဳသူတိုင္း ေတြ႕ဖူးျပီးသားျဖစ္ပါ
လိမ့္မယ္။ က်ေနာ္လဲ မၾကာခဏဆိုသလို ဒီျပႆနာေလးကိုေျဖရွင္းေနရပါတယ္။
NTLDR is missing အေၾကာင္းသည္လည္း ဆိုက္ေတာ္ေတာ္မ်ားတင္ျပီးသားပါ။ က်ေနာ္
အတြက္ မွတ္စုအျဖစ္က်န္ရေအာင္ ပို႔စ္တင္ထားျခင္းသာျဖစ္ပါတယ္။ လိုအပ္မယ့္ ပုဂိၢဳလ္
မ်ားရွိရင္ အဆင္ေျပလြယ္ကူေခ်ာေမြ႕ေစရန္ရည္ရြယ္ပါတယ္။

NTLDR သည္ Microsoft Windows NT, Windows XP and Windows Server
2003 တို႔အတြက္ ထည့္သြင္းျပဳလုပ္ထားတဲ့ boot loader ျဖစ္ပါတယ္။ အကယ္၍ သူ႔ဖိုင္
ပ်က္သြားရင္ အထက္ပါျပႆနာမ်ိဳးၾကံဳရမွာျဖစ္ပါတယ္။

NTLDR is missing ဆိုတဲ့ ျပႆနာကို ေျဖရွင္းႏိုင္တဲ့အေနအထား (၄)မ်ိဳးနဲ႔ က်ေနာ္
ေျပာျပခ်င္ပါတယ္။ ေအာက္ပါ Method (4) မ်ိဳးနဲ႔ေျဖရွင္းလို႔ရပါတယ္။

(၁) Recovery Console
(၂) Repair XP
(၃) Recovery from the Windows CD
(၄) Prevention method
+/- အျပည့္အစံုသို႔

အဲဒီ (၄)မ်ိဳးတြင္
(၁) Recovery Console နဲ႔ ေျဖရွင္းနည္း
အမွန္က ဒီလုပ္နည္းေတြဟာ ကြန္ပ်ဴတာကို စကိုင္တဲ့ပုဂၢိဳလ္မ်ားအတြက္ အဆင္ေျပဖို႔
မလြယ္ပါဘူး။ နည္းလမ္းရဖို႔သာေျပာရတာပါ။ ဘာျဖစ္ၾကိဳးစားလုပ္ေဆာင္သြားဖို႔အဓိက
ပါ။

ထုံးစံအတုိင္း Window CD စက္ထဲထည့္ျပီး Boot တက္လိုက္ပါ။ (Boot) တက္နည္း
ကိုအေသးစိတ္မေရးျပေတာ့ပါ။ boot တက္တဲ့အခ်ိန္မွာ F10 ႏွိပ္ထားပါ။
ၿပီးရင္ Command Prompt ေပၚလာရင္ fixboot C: ဆုိတဲ့စာသားကုိ ႐ုိက္ၿပီး Res-
tart ခ်လိုက္ပါ။ ဒါကတစ္နည္းေပါ့ဗ်ာ။

(၂) Repair XP နဲ႔ ေျဖရွင္းနည္း
ခုဏကအတိုင္းပဲ Window CD ကို Boot တက္လိုက္ပါ။ ေအာက္ပါပံုအတိုင္းေရာက္ရင္
system repair လုပ္ဖို႔အတြက္ r ကိုႏွိပ္ပါ။ ဒီနည္းကေတာ့ Window CD နဲ႔ system
repair လုပ္ျပီး ေျဖရွင္းတဲ့နည္းလမ္းျဖစ္ပါတယ္။


(၃) Recovery from the Windows CD နဲ႔ ေျဖရွင္းတဲ့နည္း
ထံုစမ္းအတိုင္း Window CD ကို စက္ထဲထည့္ျပီး Boot တက္လိုက္ပါ။
Boot တက္ရင္း r key ကုိ ႏွိပ္ပါ။ ျပီးေတာ့ command prompt ေပၚလာလိမ့္မည္။
အဲဒီ command prompt တြင္ ေအာက္ပါ command line မ်ား အဆင့္ဆင့္ရိုက္သြား
ပါ။
X ( X ဆိုသည္မွာ CD_ROM ရွိတဲ့ Drive Letter ကိုရိုက္ပါ)
cd i386
copy ntldr c:
copy ntdetect.com c:
ၿပီးရင္ Restart ခ်ပါ။

(၄) Prevention method နဲ႔ ေျဖရွင္းနည္း
(NTLDR, boot.ini and NTDETECT files (၃)မ်ိဳး ပါတဲ့) ၀င္းဒိုး CD ေခြကို စက္ထဲထည့္
လိုက္ပါ။
ထိုေနာက္ command prompt တြင္ copy ntldr c: ဆိုတာကို ရိုက္ထည့္ပါ။ ျပီးေတာ့ Res
tart ေပါ့ဗ်ာ။


အဆင္ေျပပါေစ...

ေစာလင္းနက္စ္

Windows XP စတက္တဲ့ အခ်ိန္မွာ...

Windows XP could not start because the following file is missing or corrupt:
\WINDOWS\SYSTEM32\CONFIG\SYSTEM
------------------------ or ------------------------------
Windows XP could not start because the following file is missing or corrupt:
\WINDOWS\SYSTEM32\CONFIG\SOFTWARE

အေပၚက ျပထားတဲ့ error တစ္ခုခု ေပၚၿပီး Windows မတက္ခဲ့ရင္ ဒီလိုေျဖရွင္းလုိ႔ရပါတယ္...
၁. Windows XP installation CD ထည့္ၿပီး boot လုပ္ပါ...
၂. Welcome to Windows XP Setup ဆုိတာ ေပၚလာရင္ Recovery Console ကို သြားဖုိ႔ အတြက္ R ကို ႏွိပ္ပါ...
+/- အျပည့္အစံုသို႔

၃. Recovery Console ဆုိတာ ပုံေတြနဲ႔ျပတဲ့ GUI မဟုတ္ဘဲ Command Line Interface ပါ... Recovery Console ကိုေရာက္ၿပီဆုိရင္
၄. md tmp ႐ုိက္ထည့္ၿပီး Enter ႏွိပ္ပါ... tmp ဆိုတဲ့ အမည္နဲ႔ folder အသစ္ တစ္ခု တည္ေဆာက္တာပါ...
၅. \WINDOWS\SYSTEM32\CONFIG\SYSTEM ဆုိတဲ့ error ျပတာဆုိရင္ေတာ့ copy c:\windows\system32\config\system c:\windows\tmp\system.bak ႐ိုက္ၿပီး Enter ႏွိပ္ပါ... c:\windows\system32\config\ ေအာက္မွာရွိတဲ့ system ဆုိတဲ့ ဖုိင္ကို က်ေတာ္တုိ႔ အဆင့္-၄ မွာ တည္ေဆာက္ခဲ့တဲ့ tmp ဆုိတဲ့ folder ေအာက္ကို system.bak ဆုိတဲ့ နာမည္နဲ႔ copy ကူးထည့္လုိက္တာပါ...
\WINDOWS\SYSTEM32\CONFIG\ SOFTWARE ဆုိတဲ့ error ျပတာဆုိရင္ေတာ့ copy c:\windows\system32\config\software c:\windows\tmp\ software.bak ႐ိုက္ၿပီး Enter ႏွိပ္ပါ...
၆. delete c:\windows\system32\config\system ႐ိုက္ထည့္ၿပီး Enter ႏွိပ္ပါ... မူလရွိေနတဲ့ system ဖုိင္ကို ဖ်က္လုိက္တာပါ... SOFTWARE error ေပးေနတာဆုိရင္ေတာ့ system ေနရာမွာ software လုိ႔ေျပာင္းေပးပါ...
၇. copy c:\windows\repair\system c:\windows\system32\config\system ႐ိုက္ၿပီး Enter ႏွိပ္ပါ... ဒါေလးက ဘာလုပ္တာလဲ ဆိုရင္ေတာ့ c:\windows\repair\ ေအာက္မွာရွိတဲ့ system လုိ႔ေခၚတဲ့ ဖုိင္ကို c:\windows\system32\config\ ေအာက္ကို copy ကူးထည့္တာပါ... ထုံးစံအတုိင္း SOFTWARE Error ျပတယ္ဆုိရင္ေတာ့ system ေနရာမွာ software လုိ႔ေျပာင္းေပးပါ...
၈. exit လုိ႔႐ုိက္ enter ႏွိပ္ၿပီး Recovery Console ကေနထြက္ပါ... ကြန္ပ်ဴတာ restart ျဖစ္သြားၿပီး ျပန္တက္လာတဲ့ အခ်ိန္ Windows ျပန္တက္လာပါလိမ့္မယ္...

support.microsoft.com

Ref: http://blog.mghla.net/2008/01/windows-xp.html

Windwo XP အတုကို အစစ္ျဖစ္ေအာင္လုပ္မယ္

သတင္းဘက္ကို အာရံုေရာက္သြားတဲ့အတြက္ ပို႔စ္ေတြမတင္ျဖစ္ေတာ့ဘူးဗ်ာ။ အခုအခ်ိန္ရတာနဲ႔ ၀င္းဒိုးXP အတုကေန
အစစ္ျဖစ္ေအာင္လုပ္တဲ့နည္းလမ္းေလးကို ေ၀ငွျခင္ပါတယ္။ ၀င္းဒိုးသံုးေနရင္းနဲ႔ ဒက္စေတာ့ Background color
အမဲေရာင္ျဖစ္သြားျပီး Task bar ေပၚတြင္လည္း Copy Window is not genuine, Victim 30 days ဆိုျပီး
၀င္းဒိုးအစစ္ကေန အတုျဖစ္သြားတယ္ဆိုရင္ Windows WGA Patcher Permanent Kit နဲ႔ ျပန္ျပီးေျဖရွင္း
တဲ့နည္းလမ္းေလးပါ။

ဒီ Windows WGA Patcher Permanent Kit, activator က ၀င္းဒိုး XP ကို genuine ျဖစ္ေအာင္
100%/% အာမခံတယ္ေလ။ အျခား activator ေတြေတာ့အမ်ားၾကီးပါ။ ဒါေပမယ့္ ၀င္းဒိုး XP ဆိုရင္ က်ေနာ္က
ေတာ့ဒါပဲၾကိဳက္တာ။ အထက္ပါ ၀င္းဒိုးxpအတြက္ ျပႆနာၾကံဳလာလွ်င္ ၀င္းဒုိးျပန္ျပီးအင္စေတာမလုပ္ရဘဲ
ဒီေဆာ့၀ဲလ္ေလးနဲ႔သက္ေတာင့္သက္သာ ၀င္းဒိုးXP Genuine ျပန္ျပီးရႏိုင္တဲ့နည္းလမ္းေလးျဖစ္ပါတယ္။ Read
Me file ပါျပီိးသား သို႔ေသာ္ နာမလည္တဲ့ပုဂိၢဳလ္ေတြအတြက္ က်ေနာ္နားလည္သေလာက္ေရးျပသြားမွာပါ။

လုပ္နည္းေလး...

အရင္ zip ဖိုဒါကို ျဖည္လိုက္ပါ။ ၎ဖိုဒါထဲမွာ keyfinder, MGADiag, wga ifx, Windows XP keygen,
WP Readme. ဆိုျပီး ဖိုင္ (၅) ခုရွိပါတယ္။

(၁)
Windows XP keygen ကလစ္ႏွစ္ခ်က္ႏွိပ္ျပီး ဖြင့္လိုက္ပါ။ Windows XP keygen ေဘာက္စ္ေပၚလာမည္။
အဲဒီမွာ product family အကြက္တြင္ WIndows XP Pro. VLK ဆိုတာကိုေရြးပါ။ ျပီးေတာ့ product ID
range အကြက္ေတြမွာ မိမိထုတ္ခ်င္တဲ့ နံပါတ္ကိုရိုက္ထည့္။ ထိုေနာက္ generate ကို ႏွိပ္။ ေအာက္အကြက္မွာ
KEY ေတြေပၚလာမည္။ ေကာ္ပီကူးထားလိုက္ပါ။

(၂)
Key Finder ကိုႏွိပ္ျပီးဖြင့္ပါ။ Microsoft Window ကိုႏွိပ္ျပီး Option ဆက္ကိုႏွိပ္။ ျပီးေတာ့ change wind
ow key ကိုႏွိပ္ အေပၚက ေကာ္ပီကူးထားတဲ့ ကီးကို ထည့္လိုက္ပါ။ OK

(၃)
wag-fix ကို Run လိုက္ပါ။ ျပီးေတာ့ yes ႏိွပ္။

(၄)
MGADiag (Microsoft Genuine Validtaion Diiagnostic Tool) ကိုႏွိပ္။ ေနာက္ continue
ကိုဆက္ႏိွပ္။ ခဏေစာင့္ ျပီးရင္ OK

(5)
အကယ္၍ သင့္ကြန္ပ်ဴတာမွာ LegitControlCheck.dll, crack ဖိုင္လုပ္ထားတာရွိရင္ C:\Windows\
Sytem32 တြင္ ၀င္ျပီး ၎ LegitControlCheck.dll ဖိုင္ကို ၀င္ဖ်က္လိုက္ပါ။

ကဲ ကြန္ပ်ဴတာကို Restart ေပါ့ဗ်ာ...

+ ေဒါင္းလုဒ္ +

Windows WGA Patcher Permanent Kit

အဆင္ေျပပါေစ...

ေစာလင္းနက္စ္

Windwo XP အတုကို အစစ္ျဖစ္ေအာင္လုပ္မယ္

သတင္းဘက္ကို အာရံုေရာက္သြားတဲ့အတြက္ ပို႔စ္ေတြမတင္ျဖစ္ေတာ့ဘူးဗ်ာ။ အခုအခ်ိန္
ရတာနဲ႔ ၀င္းဒိုးXP အတုကေနအစစ္ျဖစ္ေအာင္လုပ္တဲ့နည္းလမ္းေလးကို ေ၀ငွျခင္ပါတယ္။
၀င္းဒိုးသံုးေနရင္းနဲ႔ ဒက္စေတာ့ Background colorအမဲေရာင္ျဖစ္သြားျပီး Task bar ေပၚ
တြင္လည္း Copy Window is not genuine, Victim 30 days ဆိုျပီး၀င္းဒိုးအစစ္ကေန အတုျဖစ္သြားတယ္ဆိုရင္ Windows WGA Patcher Permanent Kit နဲ႔ ျပန္ျပီးေျဖရွင္းတဲ့နည္းလမ္းေလးပါ။

ဒီ Windows WGA Patcher Permanent Kit, activator က ၀င္းဒိုး XP ကို genuine
ျဖစ္ေအာင္100%/% အာမခံတယ္ေလ။ အျခား activator ေတြေတာ့အမ်ားၾကီးပါ။ ဒါေပ
မယ့္ ၀င္းဒိုး XP ဆိုရင္ က်ေနာ္ကေတာ့ဒါပဲၾကိဳက္တာ။ အထက္ပါ ၀င္းဒိုးxpအတြက္ ျပႆ
နာၾကံဳလာလွ်င္ ၀င္းဒုိးျပန္ျပီးအင္စေတာမလုပ္ရဘဲဒီေဆာ့၀ဲလ္ေလးနဲ႔သက္ေတာင့္သက္
သာ ၀င္းဒိုးXP Genuine ျပန္ျပီးရႏိုင္တဲ့နည္းလမ္းေလးျဖစ္ပါတယ္။ ReadMe file ပါျပီိး
သား သို႔ေသာ္ နာမလည္တဲ့ပုဂိၢဳလ္ေတြအတြက္ က်ေနာ္နားလည္သေလာက္ေရးျပသြားမွာပါ။

လုပ္နည္းေလး...

အရင္ zip ဖိုဒါကို ျဖည္လိုက္ပါ။ ၎ဖိုဒါထဲမွာ keyfinder, MGADiag, wga ifx, Windows XP keygen,
WP Readme. ဆိုျပီး ဖိုင္ (၅) ခုရွိပါတယ္။

(၁)
Windows XP keygen ကလစ္ႏွစ္ခ်က္ႏွိပ္ျပီး ဖြင့္လိုက္ပါ။ Windows XP keygen ေဘာက္စ္ေပၚလာမည္။
အဲဒီမွာ product family အကြက္တြင္ WIndows XP Pro. VLK ဆိုတာကိုေရြးပါ။ ျပီးေတာ့ product ID
range အကြက္ေတြမွာ မိမိထုတ္ခ်င္တဲ့ နံပါတ္ကိုရိုက္ထည့္။ ထိုေနာက္ generate ကို ႏွိပ္။ ေအာက္အကြက္မွာ
KEY ေတြေပၚလာမည္။ ေကာ္ပီကူးထားလိုက္ပါ။

(၂)
Key Finder ကိုႏွိပ္ျပီးဖြင့္ပါ။ Microsoft Window ကိုႏွိပ္ျပီး Option ဆက္ကိုႏွိပ္။ ျပီးေတာ့ change wind
ow key ကိုႏွိပ္ အေပၚက ေကာ္ပီကူးထားတဲ့ ကီးကို ထည့္လိုက္ပါ။ OK

(၃)
wag-fix ကို Run လိုက္ပါ။ ျပီးေတာ့ yes ႏိွပ္။

(၄)
MGADiag (Microsoft Genuine Validtaion Diiagnostic Tool) ကိုႏွိပ္။ ေနာက္ continue
ကိုဆက္ႏိွပ္။ ခဏေစာင့္ ျပီးရင္ OK

(5)
အကယ္၍ သင့္ကြန္ပ်ဴတာမွာ LegitControlCheck.dll, crack ဖိုင္လုပ္ထားတာရွိရင္ C:\Windows\
Sytem32 တြင္ ၀င္ျပီး ၎ LegitControlCheck.dll ဖိုင္ကို ၀င္ဖ်က္လိုက္ပါ။

ကဲ ကြန္ပ်ဴတာကို Restart ေပါ့ဗ်ာ...

+ ေဒါင္းလုဒ္ +

Windows WGA Patcher Permanent Kit

အဆင္ေျပပါေစ...
ေစာလင္းနက္စ္

ေနာက္ျပီးပိုစံုေအာင္ ျမန္မာမိသားစုဖိုရမ္ကေန ကိုရဲေနာင္၊ ကိုပိုင္တို႔ ၀င္းဒိုး XP
Genuine
လုပ္နည္းေလးေတြပါ ထပ္ေဆာင္းတင္ေပးလိုက္တယ္။

Microsoft Window XP ကို အစစ္ျဖစ္ေအာင္လုပ္ၾကမယ္

ခုကၽြန္ေတာ္ ရွင္းျပမွာကေတာ့ Microsoft Window XP ကိုသံုးစြဲသူေတြ ယခုအခါ
microsoft မွေနၿပီး သင့္ရဲ႕ window ဟာ geniue မျဖစ္ဘူးလို႔ ျပလာၿပီး Window Update လုပ္လို႔မရတာေတြ ၊ ေနာက္ဆံုးေပၚေလးေတြျဖစ္တဲ့ Window Media Player 11 ,
Internet Explorer 7 စတာေတြကို တင္မရတာေတြ ျဖစ္ေနပါတယ္။ ဒီလိုျဖစ္လာတဲ့
အခါ ဘယ္လို လုပ္ၾကမလဲ ဆိုတာကို ကၽြန္ေတာ္ လုပ္ေနၾက ပံုစံေလးအတိုင္းရွင္းျပပါမယ္။
၁။ ရွင္းျပခ်က္ ေအာက္ဆံုးနားမွာ ေပးထားတဲ့ လင့္ကေန Crack geniue_remover
ေလးေတြကို ေဒါင္းလုဒ္ ခ်လိုက္ပါ။ သူ႔ကို WinRAR နဲ႔ ျပန္ျဖည္လိုက္ပါ။ ၿပီးရင္ အဲဒီ့
Patcher ေလးႏွစ္ခုကို ေကာ္ပီယူပါ။ ေကာ္ပီယူၿပီး C:\Windows\System 32\ ထဲကိုသြားထည့္လိုက္ပါ။နမူနာကို ေအာက္က ပံုေလးမွာ ၾကည့္လိုက္ပါ။


၂။ ၿပီးရင္ နာရီပံုေလးလိုျဖစ္ေနတာေလးကို အရင္ runပါမယ္။ သူ႔ကို run တဲ့အခါ Apply
button ကိုႏွိပ္လိုက္တဲ့ အခါ Cracking Complete( ပံုမွာျပထားသလို ) ဆိုတဲ့စာေလးေပၚ
လာပါမယ္။ ဒါေပမယ့္ ခ်က္ခ်င္းမပိတ္ လိုက္ပါနဲ႔။ ၅ စကၠန္႔ေလာက္ ေစာင့္ေနလိုက္ပါ


၃။ ၿပီးမွ MSN အိုင္ကြန္ေလးလို ျဖစ္ေနတာကို run ပါ။ သူ႔ကို run ၿပီးတာနဲ႔ ခ်က္ခ်င္း
restart ေပးဖို႔မေမ့ပါနဲ႔။ ဒါဆိုရင္ သင္ Microsoft ကေန ႀကိဳက္တာအားလံုး update ,
download အကုန္ လုပ္လို႔ရပါၿပီ။ အေကာင္းဆံုးကေတာ့ ဒီ Patcher ေလးႏွစ္ခုကို
Window XP စတင္ၿပီးတာနဲ႔ ခ်က္ခ်င္းလုပ္ႏိုင္ရင္ အေကာင္းဆံုးပါပဲ။


၄။ ခုလို လုပ္ၾကည့္လို႔ မွ အဆင္မေျပဘူးလား ။ က်န္ပါေသးတယ္။ ေနာက္တမ်ိဳးကေတာ့
Magic Registration Key လို႔ေခၚပါတယ္။ Registration Key ကိုေဒါင္းလုဒ္ ခ်လိုက္ပါ ၊
ျဖည္လိုက္ပါ။ ၿပီးရင္ run လိုက္ပါ။ run တာကလြယ္ပါတယ္။ Double Click ေပးလိုက္ရံု
ပါပဲ။ အဲလိုေပးလို႔မွ မရဘူးဆိုရင္ေတာ့ Start Menu ---> Run မွာ regedit ဆိုၿပီး ရိုက္
လိုက္ပါ။ Registry Editor Window ေပၚလာပါမယ္။ File Menu ေအာက္က Import
ကိုႏွိပ္ၿပီး ခုန ေဒါင္းလုဒ္ခ်ထားတဲ့ magic registration key ေလးရွိတဲ့ေနရာကို Browse
window ကေနသြားၿပီး Open ေပးလိုက္ပါ။ Message Box တက္လာရင္ Ok ေပးလိုက္
ပါ။ ဒါဆို registry key ကိုသြင္းၿပီးသြားပါၿပီ။ ၿပီးတာနဲ႔ Microsoft ကေနႀကိဳက္တာ ေဒါင္း
လုဒ္ခ်လို႔ရပါၿပီ။ ဒါေပမယ့္ သူက ကြန္ပ်ဴတာကို restart မေပးခင္ပဲရတာပါ။ ဒါေၾကာင့္
ေနာက္တႀကိမ္ Microsoft ကေနေဒါင္းလုဒ္ ခ်ခ်င္ရင္ ၊ update လုပ္ခ်င္ရင္ ေနာက္တ
ႀကိမ္ျပန္ run ရပါမယ္။ အားလံုး အဆင္ေျပၾကပါေစ။

Download Link...
http://www.4shared.com/file/GTyc-auk...e_remover.html

ကိုရဲေနာင္

Microsoft Window XP ကို အစစ္ျဖစ္ေအာင္လုပ္ၾကမယ္

က်ေနာ္လုပ္ေနက် နည္းေလးတစ္နည္းကုိလည္း ေ၀မွ်ပါရေစ။ ေအာက္က RAR ဖုိင္ကုိ အရင္ေဒါင္းလုတ္ခ်လုိက္ပါဦး။

Download Link...
Make_Genuine_WinXP.rar (299.44 KB)
(or)
Make_Genuine_WinXP.rar (299.44 KB)

ၿပီးရင္ႀကိဳက္တဲ့ေနရာမွာ ျပန္ျဖည္ခ်လုိက္ပါ။ အဲဒီဖုိလ္ဒါထဲမွာ ဖုိင္သုံးဖုိင္ေတြ႔ရပါမယ္။ အဲဒီထဲက
Make Genuine.reg ဆုိတဲ့ registry ဖုိင္ကို double-click လုပ္ပါ။ တစ္ခ်ိဳ႕စက္ေတြမွာ registry
file ေတြကုိ တန္းဖြင့္လုိ႔မရဘဲ error window ေတြတက္လာတတ္တယ္။ အဲဒီအခါက်ရင္ Regist
ry Editor ကုိဖြင့္ၿပီး ကုိယ္ထည့္ခ်င္တဲ့ registry file ကုိ import လုပ္ေပးရပါမယ္။ ဒီလုိလုပ္ပါ။

- Start -> Run ကုိဖြင့္ပါ။ (Windows Key + R)
- regedit လုိ႔ရုိက္ၿပီး OK ေျပာပါ။
- ေပၚလာတဲ့ Registry Editor ၀င္းဒိုးမွာ File -> Import... အဆင့္ဆင့္သြားပါ။
- Import Registry File မွာ ကုိယ္ထည့္ခ်င္တဲ့ ဖုိင္ကုိေရြးၿပီး Open ေျပာပါ။ ဒါဆုိရင္ ဖုိင္ထည့္လုိ႔ေအာင္ျမင္ေၾကာင္း box တစ္ခုတက္လာပါမယ္။ OK ေျပာပါ။

ဒါဆုိရင္က်ေနာ္တုိ႔ရဲ႕ Windows ဟာ အစစ္အမွန္ျဖစ္သြားပါၿပီ။ တကယ္ျဖစ္မျဖစ္ Tool တစ္ခုနဲ႔စစ္ၾကည့္ရေအာင္။ ခုနက ဖိုင္သံုးဖုိင္ထဲက Microsoft Genuine Advantage Diagnostic Tool ဆုိတဲ့ဖုိင္ကုိ run ပါ။ ခဏေစာင့္ၿပီးရင္ ၀င္းဒုိးတစ္ခုတက္လာပါမယ္။ အဲဒီမွာ Genuine validation status မွာ Genuine ဆုိတဲ့ အစိမ္းေရာင္စာသားကုိျမင္ရပါမယ္။ (တကယ္လုိ႔ registry ဖုိင္ကုိ import မလုပ္ခင္ ဒီ tool နဲ႔စမ္းခဲ့ရင္ validation status မွာ Invalid ဆုိၿပီးအနီေရာင္စာသားကုိ ျမင္ရပါမယ္။) ကဲ... ခုခ်ိန္ကစၿပီး ၀င္းဒိုးစ္အပ္ဒိတ္ေတြ၊ MS Genuine Software ေတြကုိ ေဒါင္းလုတ္ခ်ႏုိင္ပါၿပီ။
Screenshots ေတြကုိ ၾကည့္လုိက္ပါဦး။


Import Method


Drag & Drop Method


ကိုပိုင္

How to Fix Icon Background Colors in XP

ခရီးထြက္သြားေတာ့ ပို႔စ္ေတြသိပ္မတင္ျဖစ္ဘူး။ ျပန္ေရာက္တာနဲ႔ လိုအပ္မယ့္ပို႔စ္ေလးေတြတင္လိုက္အံုးမယ္။
How to Fix Icon Background Colors in W XP ဆိုတာ တစ္ခါတစ္ေလ ဟိုကလိဒီကလိနဲ႔
Desktop ေပၚက icon ေလးေတြ color background ေတြျဖစ္သြားတတတ္ပါတယ္။ အဲလိုျဖစ္
သြားရင္ ျပန္ျပီး transparent background ျဖစ္သြားေအာင္ လုပ္တဲ့နည္းေလးကိုေ၀ငွခ်င္ပါတယ္။
မသိေသးတဲ့ပုဂၢိဳလ္မ်ားအတြက္ေပါ့ဗ်ာ...

Transparent Background


Color Background


transparent background ျပန္ျဖစ္ဖို႔အတြက္ Control Panel> System Properties
ကိုဖြင့္ပါ။ ဒါမွမဟုတ္ My Computer ကို right click> properties ကိုႏွိပ္ပါ။

ထိုေနာက္ Menu တြင္ Advance tab ကိုႏွိပ္ျပီး ေအာက္တြင္ setting ကိုႏွိပ္ပါ။


ျပီေတာ့ ေဘာက္စ္တစ္ခုထပ္က်လာမည္...Custom ကို အမွန္ျခစ္လိုက္ပါ Scroll down ကို စြဲခ်ျပီး
Use drop shadows for icon labels on the desktop ကို ေလးေထာင့္ကြက္ကို အမွန္
ျခစ္လိုက္ပါ။


အဆင္မေျပေသးရင္ ေအာက္ပါ English လိုေရးထားေလးေတြကို စမ္းၾကည့္ေစခ်င္တယ္။ ဘာသာ
ျပန္ရတာပ်င္းေတာ့ ဒီအတိုင္းပဲတင္ေပးလိုက္တယ္။

# If that doesn’t work, the problem could be that you have your desktop set as a web page. I always avoid this setting just for performance reasons, but you may have accidentally turned it on while playing around with the settings. To turn it off, just go into the Display settings under the Control Panel. Under the Desktop tab, click the Customize Desktop button, then click the Web tab and make sure nothing is selected in there. Click OK and now check out your icons.

# Another thing to check in regard to the desktop is to make sure you don’t have Web Items locked. To fix this, right click on the desktop and then go to the ‘Arrange Icons By’ section and make sure ‘Lock Web Items on Desktop’ is not checked, as this is known to cause some problems.

# If turning off web page desktop doesn’t work, it could be that you don’t have your Display settings at the right number of colors. If you have them turned down, this often results in weird shades of colors and you’ll probably notice that some photos don’t look the way they should. To change the Color Quality, go into the Display settings under Control Panel, then click on the Settings tab. Under the Color Quality section, make sure it is set to 32-bit, as this will yield the highest number of colors. If 32-bit is not an option, you may need to update your video card drivers

Original site

Alt+Ctrl+Delete ႏွိပ္မွ ၀င္းဒိုးပြင့္တဲ့ျပႆနာ

တစ္ေန႔က မာန္က်၀္ဖူ႔တာမိက္ေမးသြားတယ္ သူ႔ကြန္ပ်ဴတာက Alt+Ctrl+Delete ကီးႏွိပ္ျပီးမွ ၀င္းဒိုးပြင့္လာတယ္။
အဲဒါဘယ္လိုလုပ္ရမလဲတဲ့။ က်ေနာ္လဲ အတိအက်မသိတာနဲ႔ ”ျမန္မာခ်က္အြန္လိုင္း ဖိုရမ္”ကို အားကိုရေတာ့တာပဲ။
Forum ဆိုတာ က်ေနာ္တို႔လို ေလ့လာသူမ်ားအတြက္ အျမဲ၀င္ေရာက္ဖတ္သင့္တဲ့ေနရာေတြျဖစ္တယ္။ ဒါေၾကာင့္ မိမိသိ
လိုေသာ အေၾကာင္းအရာမ်ားကို ဖိုရမ္ကို၀င္ေရာက္ျပီး ေဆြးေႏြးျခင္းျဖင့္ မသိတာေလးေတြကို အဆင္ေျပႏိုင္ေၾကာင္းပါ
ခင္ဗ်ာ။

အခု ”ျမန္မာခ်က္အြန္လိုင္း ဖိုရမ္ထိန္း” ညီငယ္တစ္ေယာက္ကေျဖေပးတဲ့ အေျဖအတိုင္းပဲ ပို႔စ္ျပန္တင္လိုက္ပါတယ္။
အဂၤလိပ္လိုဆိုေပမယ့္ လြယ္ကူတဲ့လုပ္ေဆာင္ခ်က္ျဖစ္သည့္အတြက္ ျမန္မာလိုျပန္မေရးေတာ့ဘူးဗ်ာ။ မာန္က်၀္ဖူ႕တာမိက္
ေရ...အဆင္ေျပပါေစေနာ္...

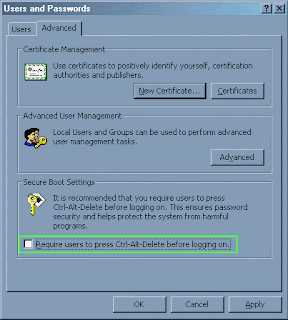
To Enable or Disable the CTRL+ALT+DELETE Sequence


1. Click Start, click Control Panel, and then click User Accounts.
2. Click the Advanced tab.
3. In the "Secure logon" section, select or clear the "Require users to press Ctrl+Alt+Delete" check box.


Another Way,

1. Start the registry editor ( Start ==> Run ==> type regedit.exe)
2. Move to HKEY_LOCAL_MACHINE\SOFTWARE\Microsoft\Windows NT\CurrentVersion\Winlogon
3. Double click on DisableCAD (create of type REG_DWORD if it does not exist)
4. Set to 1 if you don't want to have to press Ctrl-Alt-Del, and set to 0 if you do. Click OK
5. Close the registry editor
6. Reboot Your PC.

ေျဖၾကားေပးတဲ့ညီေလးရဲ႕လင့္

Desktop Tab Missing


XP ေတြမွာ Desktop Tab ေပ်ာက္သြားတဲ့ျပႆနာၾကံဳဖူးၾကပါလိမ့္မယ္။ အဲလိုျပႆနာမ်ိဳးေတြ႕ခဲ့ရင္
Desktop Tab ျပန္ျပီးေပၚေအာင္ လုပ္ေဆာင္ခ်က္ေလးပါ။ တစ္ခ်ိဳ႕က ေဆာ့၀ဲလ္နဲ႔ေျဖရွင္းတဲ့နည္းလမ္းလဲ
ရွိပါတယ္။ ဒါေပမယ့္ ဘာေဆာ့၀ဲမွမသံုးဘဲ Group Policy Editor နဲ႔ ေျဖရွင္းတဲ့နည္းလမ္းေလးကို
စမ္းၾကည့္ရေအာင္...


(၁) Start Menu က Run Command or Window+r ကိုဖြင့္ျပီး gpedit.msc ဆိုတာကိုရိုက္ထည့္
Enter
(၂) Navigate to User Configuration ေအာက္က Administrative Templates ကိုႏွိပ္
(၃) ညာဖက္က Windows Components ကို ကလစ္ႏွစ္ခ်က္ႏွိပ္ ေနာက္ျပီး Windows Exploror
ကလစ္ႏွစ္ခ်က္ႏွိပ္
(၄) Turn on Classic Shell ကို ကလစ္ႏွစ္ခ်က္ႏွိပ္ ထိုေနာက္ screenshot တစ္ခုေပၚလာမည္။
(၅) အဲဒါကို Not Configured ကိုႏွိပ္ျပီး Apply/ Ok

Origenal Link

Sawlinux

ဝင္းဒိုးစ္ ထည့္သြင္းျခင္း (Installing Window XP)

ေစာေက်ာ္ခေရာ့စ္

၀င္းဒိုးစ္ ထည့္သြင္းျခင္း (Windows OS installation)


ကဲ … အခု ကြန္ျပဴတာ တလံုးကို ၀င္းဒိုးစ္အသစ္ ျပန္တင္ေပးဖို႔ လိုအပ္လာၿပီ ဆိုပါစို႔။ Windows installor CD တခ်ပ္ေတာ့ ရွိထားရပါမယ္။ အခု ဒီမွာေတာ့ Windows XP 2 ထည့္သြင္းပံုကို တဆင့္ခ်င္း ေဖာ္ျပေပးပါမယ္။

1. စီဒီကို စီဒီရြမ္ထဲ ထည့္ထားပါ။
2. ကြန္ျပဴတာကို ရီစတတ္ (Restart) လုပ္လိုက္ပါ။

3. POST (power on self test) ေပၚလာခ်ိန္မွာ ကီးဘုတ္ေပၚက Delete ကီးကို ေခါက္ေပးပါ။ BIOS setup (basic input / output system ေပၚလာေစဖို႔ ျဖစ္ပါတယ္။ (BIOS အမ်ိဳးအစားအလုိက္ ပံုစံေတြကြဲျပားပါလိမ့္မယ္။ အလုပ္လုပ္ပံုကေတာ့ အတူတူပါဘဲ။)


4. First Boot ကို စီဒီရြမ္ေျပာင္းၿပီး Exit လုပ္ပါ။ (Boot ကို ဖြင့္ၿပီး First ေနရာမွာ CD-Rom ေျပာင္းေပးပါ။)
5. Press any key to boot from CD စာတန္း ေပၚလာရင္ Enter ေခါက္လိုက္ပါ။
7. Windows Setup ဆိုတာေပၚလာပါမယ္။ ဘာမွလုပ္စရာမလိုပါဘူး။ ေစာင့္ေနပါ။ (ေနာက္အဆင့္ကေနၿပီးေတာ့ ပံုေတြနဲ႔ ျပသြားပါမယ္။)

8. Windows License Agreement ျဖစ္ပါတယ္။ “F8” ကိုေခါက္ေပးပါ။


9. လက္ရွိ ရွိႏွင့္ၿပီးသား ၀င္းဒိုးစ္ကို ျပင္မွာလား၊ မျပင္ဘူးလား ေမးတာပါ။ Don’t Repair ျပင္ဖို႔မလိုတဲ့အတြက္ “ESC” ကိုေခါက္ေပးပါ။


10. အခုရွိေနတဲ့ ပါေတးရွင္းကို ဖ်က္ပစ္ဖို႔ ေမးတာပါ။ “D” ကိုေခါက္ေပးပါ။


11. ပါေတးရွင္းဖ်က္တာကို ေသခ်ာေအာင္ထပ္ေမးတာပါ။ “Enter” ေခါက္ေပးပါ။


12. ဖ်က္ဖို႔ ထပ္ေမးတာပါဘဲ။ “L” ကိုေခါက္ေပးပါ။ ပါေတးရွင္း ၂ခု/၃ခု ရွိခဲ့ရင္ ဒီအဆင့္ကို ၂ခါ/၃ခါ ထပ္လုပ္ေပးရပါမယ္။


13. ပါေတးရွင္း အသစ္လုပ္ယူဖို႔ျဖစ္ပါတယ္။ “C” ကိုေခါက္ေပးပါ။


14. ပါေတးရွင္း အရြယ္သတ္မွတ္ဖို႔ပါ။ (ေအာက္မွာရွင္းျပထားတာကို ေသခ်ာဖတ္ပါ။)

option A >>> Drive-C တခုထဲ ထားခ်င္ရင္ “Enter” ေခါက္လိုက္ပါ။

option B >>> ဟာ့ဒစ္က 80 GB ရွိၿပီး Drive-C 30 GB, Drive-D 50 GB စသျဖင့္ ခြဲထားခ်င္ရင္ေတာ့
Partition C အရြယ္ကို အရင္သတ္မွတ္ေပးပါ။

Drive C ကို 30 GB ထားခ်င္ရင္ 30720 လို႔ ထည့္ေပးၿပီးမွ “Enter” ေခါက္ပါ။ (1GB=1024MB)
ဒါဆိုရင္ C: Partition … 30720 MB စာတန္း ေပၚလာပါမယ္။

သူ႕ေအာက္မွာ Free space ေနရာလြတ္က်န္တာကို Drive D အတြက္သတ္မွတ္ရပါမယ္။ ကီးဘုတ္ေပၚက arrow key ကိုသံုးၿပီး ေအာက္က ဖရီးစေပ့ကို Select လုပ္ပါ။ Create Partition လုပ္ဖို႔ “C” ကိုေခါက္ပါ။ “Enter” ေခါက္ပါ။

ဒါဆို ပါေတးရွင္း ၂ခုခြဲၿပီး ျဖစ္သြားပါမယ္။


15. Select လုပ္ထားတဲ့ ပါေတးရွင္းမွာ ၀င္းဒိုးစ္ ထည့္သြင္းဖို႔ျဖစ္ပါတယ္။
C: Partitions ကို ေရြးထားၿပီးျဖစ္တယ္ဆိုရင္ “Enter” ေခါက္လိုက္ပါ။


16. ဖိုင္ စစ္စတမ္ ေရြးဖို႔ပါ။
NTFS ကိုေရြးထားၿပီးျဖစ္တယ္ဆိုရင္ “Enter” ေခါက္လိုက္ပါ။


17. ၀င္းဒိုးစ္ စၿပီး အင္စေတာ လုပ္ေနတာပါ။
ထိုင္ၾကည့္႐ံုပါဘဲ။
ေစာင့္ၾကည့္ရင္းနဲ႔ ေနာက္ထပ္ပံုစံေျပာင္းသြားတာရွိလာပါမယ္။ ဘာမွလုပ္စရာမလိုပါ။


18. ကြန္ျပဴတာအသံုးျပဳတဲ့ေဒသ (Regional)၊ ကြန္ျပဴတာမွာသံုးမယ့္ ဘာသာစကား (Language) သတ္မွတ္ဖို႔ပါ။
“Customize” ကိုကလစ္ၿပီး English (United State) ကိုေရြးေပးပါ။ ၿပီးရင္ “Next” ကို ကလစ္ပါ။


19. ကြန္ျပဴတာသံုးသူ နာမည္နဲ႔ အဖြဲ႕အစည္း နာမည္ ထည့္ဖို႔ပါ။
တခုခုထည့္ေပးလိုက္ပါ။


20. ကြန္ျပဴတာ အမည္သတ္မွတ္ဖို႔ပါ။
တခုခုထည့္ေပးပါ။ သူ႕အတိုင္းထားလည္း ရပါတယ္။ ပတ္စ၀ါဒ္လည္း ထည့္ေပးႏိုင္ပါတယ္။
မထည့္ဘဲ ထားလည္း ဘာမွမျဖစ္ပါဘူး။


21. ေန႔စြဲ၊ အခ်ိန္နဲ႔ ေဒသစံေတာ္ခ်ိန္ေတြ သတ္မွတ္ဖို႔ပါ။
ဒီေန႔ ေန႔စြဲ၊ အခ်ိန္ေတြ သတ္မွတ္ေပးပါ။
Time Zone မွာေတာ့ ျမန္မာျပည္ဆို ရန္ကုန္၊ ထိုင္းဆို ဘန္ေကာက္ စသျဖင့္ ကိုယ့္ကြန္ျပဴတာမွာ အသံုးျပဳမယ့္ ေဒသစံေတာ္ခ်ိန္ ေရြးေပးလိုက္ပါ။


22. “Next” ကိုဘဲ ကလစ္လုပ္ပါ။


23. ဒီမွာလည္း “Next” ကိုဘဲ ကလစ္ပါ။


24. ထိုင္ၾကည့္႐ံုပါဘဲ။


25. ဆက္ၾကည့္ေနလိုက္ပါဦး။


26. အိုေကကိုဘဲ ကလစ္လိုက္ပါ။


27. ဒီမွာလည္း အိုေကပါဘဲ။


28. “Next” ကိုကလစ္ပါ။


29. “Skip” ကိုကလစ္ပါ။


30. “No” ကို check လုပ္ၿပီး “Next” ကိုကလစ္ပါ။


31. ဒီမွာလည္း “No” ကို check လုပ္ၿပီး “Next” ကိုကလစ္ပါ။


32. ကြန္ျပဴတာအသံုးျပဳသူအမည္ထည့္ေပးဖို႔ပါ။
တခုခုထည့္ေပးပါ။ ဘာနာမည္ျဖစ္ျဖစ္ေပါ့။ အေပၚဆံုးက တခုထည့္ရင္ လံုေလာက္ပါၿပီ။


33. ေက်းဇူးတင္ပါတယ္တဲ့။ မိုက္ခ႐ိုေဆာ့က ေျပာတယ္။
“Finish” ကိုကလစ္ပါ။


34. ခဏေစာင့္ပါ။


35. အိုေက။ ဒီမွာ ၀င္းဒိုးစ္ ပြင့္လာပါၿပီ။


၀င္းဒိုးစ္ စီရီယယ္နံပါတ္ (Windows Serial Number or Product Key)

က်ေနာ္တို႔ သံုးေနတဲ့ ၀င္းဒိုးစ္ အင္စေတာ္လာ စီဒီေတြက အမ်ိဳးမ်ိဳးဆိုေတာ့ နံပါတ္ေတြလည္း အမ်ိဳးမ်ိဳး ျဖစ္ေနပါလိမ့္မယ္။ ကိုယ့္စီဒီမွာ ေရးထားေပးတဲ့ နံပါတ္ကို ထည့္ရမွာပါ။ ၀င္းဒိုးစ္ထည့္သြင္းစဥ္ တေနရာရာမွာမ်ား ေအာက္ကပံုမွာျပထားတဲ့ အတိုင္း Serial no. ေမးလာခဲ့ရင္ က်ေနာ္လက္ရွိသံုးေန တဲ့ နံပါတ္က wgp2m-g8m6t-bt7d4-p7ry7-27k76 ျဖစ္ပါတယ္။ ၿပီးေတာ့ Next ကိုႏွိပ္ေပါ့ေလ။ (တကယ္လို႔မ်ား နံပါတ္ မွားေနတယ္ ေျပာရင္ www.serials.ws ကေနတဆင့္ ၀င္းဒိုးစ္ စီရီရယ္ နံပါတ္ေတြ လိုက္ရွာႏိုင္ပါတယ္။)

37. နံပါတ္ထည့္ေပးၿပီး Next ကိုကလစ္ပါ။